Most people who train with dumbbells spend a lot of time on curls, presses, and lateral raises. The back gets an afterthought — usually some bent-over rows thrown in at the end, done with too much weight and a lot of torso swinging. The chest supported dumbbell row does not let you get away with that.
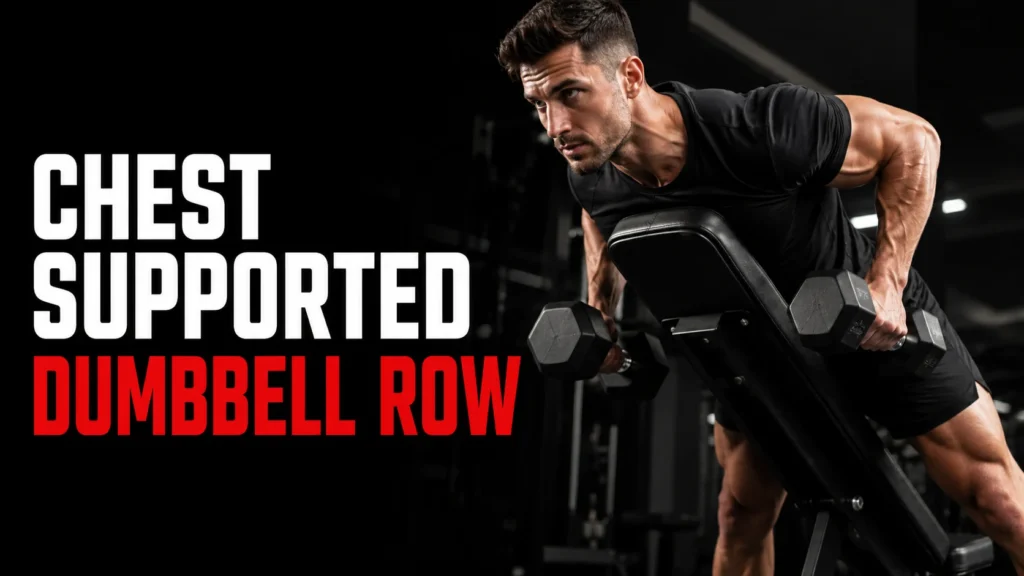
It is not a flashy exercise. You lie face-down on a bench, grab two dumbbells, and pull. But the way it forces honest work, is what separates it from most other dumbbell back movements. The bench removes every excuse. You either use your lats and rhomboids, or the reps simply do not happen.
What Is the Chest Supported Dumbbell Row?
The chest supported dumbbell row — also called the incline dumbbell row or prone dumbbell row — is a horizontal pulling exercise performed lying face-down on an incline bench. Your chest stays pressed against the pad throughout every rep, which removes the ability to cheat by rocking the torso or using the lower back to generate momentum.
That constraint is the whole point. When you perform rows with your chest supported, you limit the amount of rocking, which places all the work onto the back and biceps. In a standard bent-over row, your spinal erectors, glutes, and hamstrings are all working overtime just to hold your position. Here, the bench absorbs that job, leaving your back muscles with no choice but to do the pulling.
It fits into back workouts, pull days, upper body sessions, or full-body training. Beginners use it to learn proper rowing mechanics before loading up heavier movements. Experienced lifters use it to chase a pump at the end of a hard session, or to accumulate back volume without piling more spinal load onto days that already include deadlifts or barbell rows.
Muscles Worked in the Chest Supported Dumbbell Row
Primary Muscles
Latissimus Dorsi
The lats are the large, fan-shaped muscles that run from your mid and lower back up to your upper arm. The dumbbell row works your back muscles in a horizontal pulling movement, primarily hitting your latissimus dorsi, trapezius, and posterior deltoids. The lats handle the bulk of the pulling work when your elbows travel close to your sides, driving back toward your hips.
Trapezius
The trapezius is not just the muscle that gets sore from stress. It has three distinct regions — upper, middle, and lower — and the chest supported row targets all three to varying degrees. The middle traps are especially active during scapular retraction at the top of the movement. The lower trapezius works with the upper traps to raise the arms above the head, providing balance and stability. A steeper bench angle shifts slightly more emphasis toward the upper traps and rhomboids.
Rhomboids
Sitting between your shoulder blades, the rhomboids are responsible for pulling the scapulae together and holding them in place. They are chronically weak in people who sit at desks for hours, and this exercise is one of the best ways to directly strengthen them. You feel them engaging most powerfully during that brief pause at the top of the rep when you squeeze the shoulder blades.
Secondary Muscles
Rear Deltoids
The rear deltoids are crucial for balanced shoulder development and enhancing visual symmetry. They help move the arms away from the body and behind it, enhancing shoulder stability and width, and assisting with pulling and throwing. Well-developed rear delts play a key role in preventing shoulder injuries. Flaring the elbows out slightly during the row shifts more load onto the rear delts, which is useful if that is a weak point for you.
Biceps Brachii and Brachialis
These elbow flexors assist with the pull, especially when using an underhand grip. They are not the focus of the exercise, but they work throughout. If you want to shift more effort into the back and less into the arms, use an overhand grip and think about driving your elbows rather than pulling with your hands.
Rotator Cuff Muscles
The rear delts work with other muscles of the rotator cuff to stabilize the shoulder joint during movement, helping to prevent injuries and maintain a healthy shoulder function. This is one reason the chest supported row has a reputation for being shoulder-friendly: the supported position reduces the demand on these small stabilizers, and the controlled range of motion lets them work without being overloaded.
Forearm Flexors and Grip Muscles
Holding two dumbbells through a full set accumulates grip fatigue. Performing chest-supported rows, especially when using an underhand (supinated) grip, can help improve grip strength and endurance by engaging the biceps brachii and increasing the activation of the forearm muscles. If grip fails before your back does, lifting straps are a legitimate tool — the goal is back training, not a grip challenge.
How to Set Up for Chest Supported Dumbbell Rows
Bench Angle: 30 to 45 Degrees
A steeper angle might target the upper traps and rhomboids a bit more, while a flatter angle might emphasize the lats better. However, these are very small differences, so just find an angle that suits you well.
The practical starting point for most people is around 30 to 35 degrees. At 45 degrees, there is a tendency to shrug a bit, so starting at 30 degrees gives you a better baseline, and you can move up or down depending on how it feels.
One thing to check before you lie down: make sure the bench is low enough that your arms can hang completely straight toward the floor when you hold the dumbbells. If the bench is too high, you are already starting with a shortened range of motion.
Foot Position and Body Stability
Digging the toes into the ground so you do not slide around while rowing is worth doing as a deliberate setup step. Some people prefer feet flat on the floor on both sides of the bench. Others feel more stable with knees bent and resting on the lower seat pad. Shearing forces on the lower back are greatly reduced by crossing your legs and keeping feet in the air compared to planting the feet on the floor — so if you have any history of lower back discomfort, that modification is worth trying.
Your chest and stomach should be fully supported against the pad. Your chin should be above the top of the bench, not resting on it. Head in a neutral position — looking slightly down or forward, not craning upward.
Pre-Loading the Shoulder Position
Before you pull even one rep, take a second to set your shoulder blades. Think about tucking your shoulder blades into your back pockets — this pre-sets your scapulae and protects the front of your shoulders. It sounds like a small detail, but starting each set from a position of slight retraction instead of full protraction makes a noticeable difference in how immediately your back muscles engage on the first rep.
How to Do Chest Supported Dumbbell Rows: Step-by-Step Form
Step 1 — Get Into Position
Set the bench to roughly 30 to 35 degrees. Place your dumbbells on the floor in front of the bench, or balanced on the feet of the bench where you can grab them easily. Lie face-down with your chest firmly pressed into the pad. Reach down and pick up one dumbbell at a time. Let your arms hang fully extended toward the floor, holding the dumbbells with a neutral grip (palms facing each other) to start.
Step 2 — Brace and Stabilize
Give your hips a slight tuck, engage your core, and grab a weight in each hand. This sets up a nice frame to pull from. Your lower back should not be arched dramatically or collapsed. A neutral spine and a mild posterior pelvic tilt is the goal.
Step 3 — Initiate With the Shoulder Blades
Do not start the pull with your hands. Start it with your shoulder blades. Think about pulling them back and down before your elbows even begin to bend. This sequencing ensures the back muscles do the work from the very beginning of each rep rather than handing the job to the biceps.
Step 4 — Drive the Elbows Back
Drive your elbows toward your hips, keeping them about 30 to 45 degrees from your torso — not flared straight out. Aim to bring the dumbbells roughly to the lower ribs or upper waistline, depending on your limb length and comfort.
You are not pulling the dumbbells up toward your chin. You are pulling them back in a horizontal direction, ending near the sides of your ribcage. Pulling the dumbbells back so they land near the sides of the ribcage gives a good range of motion.
Step 5 — Pause and Squeeze at the Top
Pause for a full second. It is a small thing that makes a big difference. At the top of the rep, your elbows should be at or just past the midline of your body, shoulder blades squeezed together. Holding that position for even one second forces your rhomboids and mid-traps to actually work for their money instead of just being along for the ride.
Step 6 — Lower With Control
Take 2 to 3 seconds on the way down. Do not just drop the weights — the lowering phase is where a lot of the muscle-building happens. Allow the shoulder blades to spread apart fully at the bottom before the next rep. That full protraction at the bottom and full retraction at the top is what gives this exercise its range of motion advantage over many machine alternatives.
Step 7 — Reset and Repeat
Let your shoulder blades fully spread apart before the next rep. Full range of motion both ways is what makes the set actually count.
Grip Variations and What They Change
Neutral Grip (Palms Facing Each Other)
This is the most common starting point and the most comfortable for the shoulder joint. A neutral grip provides more brachioradialis and lat involvement. The wrist is in a natural position throughout the movement, which reduces the chance of irritating the forearm or elbow.
Overhand Grip (Palms Facing the Floor)
A pronated grip engages the lats further. It also increases the challenge on the rhomboids and upper back. The trade-off is that it can feel harder on the wrists for some people, particularly at the bottom of the rep when the arms are extended.
Underhand Grip (Palms Facing the Ceiling)
A supinated grip places more challenge on the biceps. It also tends to target the lower lats more effectively by allowing a slightly different shoulder angle during the pull. If your biceps are a weak link in your rowing and you want them to contribute more, this grip works for that purpose.
Wide Elbow Position
A wider grip row with some lighter weights, with the elbows flared out a touch, focuses more on the upper back. This is not the primary way to do the exercise, but rotating in a set with elbows flared is a good way to give more direct attention to the rear delts and upper traps when those areas are lagging.
Common Mistakes That Limit Your Results
Using Too Much Weight
This is the most frequent problem. Going too heavy is the fastest way to turn a great back exercise into a sloppy, shoulder-irritating movement. If the weight forces you to yank, bounce, or lose contact with the bench, it is too heavy. Because momentum is eliminated by the bench, you will handle less weight here than on a bent-over row. That is not a flaw — it is the exercise working as intended.
Lifting the Chest Off the Bench
As you go heavier, the natural compensation will be to lift your chest. Keeping your chest against the bench will eliminate momentum and work the muscles you want. If you notice your torso peeling off the pad during the top of the pull, reduce the weight or consciously press your chest down before starting the next rep.
Shrugging Instead of Rowing
Shrugging a lot while doing this exercise takes away from the work you are trying to give the lats. It also limits the range of motion you are working through and changes the intent of the exercise. The cue that helps most people is to think about pulling the elbows down and back rather than pulling the hands up. The elbows drive the movement; the hands just hold the dumbbells.
Flaring the Elbows Straight Out
When your elbows flare straight out to the sides, you overload the shoulder joint and shift tension away from the lats. Keep your elbows angled slightly toward your hips, not toward your ears, to protect your shoulders and keep the right muscles working.
Skipping the Bottom Stretch
Stopping the rep early at the bottom — never fully extending the arms — removes the lengthened position where a lot of muscular tension and subsequent adaptation happens. Not fully extending the arms at the bottom or not fully retracting the shoulder blades at the top of the movement reduces the exercise’s effectiveness.
Rushing the Eccentric
The lowering phase does not get discussed enough. Rapid lowering reduces time under tension and limits hypertrophy stimulus. Control the descent. A controlled 2 to 3-second eccentric on every rep adds meaningful training volume without requiring heavier weights.
Letting the Head Jut Forward
Do not allow the head to jut forward as you pull. It looks subtle from the outside but creates unnecessary cervical spine strain over hundreds of sets. Keep the chin neutral, looking slightly toward the floor or forward in a controlled position.
Benefits of Chest Supported Dumbbell Rows
Eliminates Cheating Mechanics
The bench makes momentum-based rowing impossible. You cannot sway your torso, use your legs, or drive with your hips. Every rep is honest. This makes it one of the best exercises for people who tend to cheat their bent-over rows without realizing it.
Lower Back-Friendly Back Training
If you are deadlifting, squatting, barbell rowing, and doing other exercises that put a lot of stress on the spine but still want to get some isolated back work, the chest supported dumbbell row works really well because it limits overall spinal loading and stress. For athletes with existing lower back problems, this exercise allows continued back development without aggravating lumbar tissue.
Identifies and Addresses Imbalances
Because each arm works independently, strength differences between left and right become immediately apparent. The single-arm variation takes this further — training each side in isolation so that the stronger side cannot compensate for the weaker one.
Allows High-Rep, High-Fatigue Training Safely
You can very safely go to high levels of fatigue and almost failure on your reps. Even if you break form, the dumbbells are only about two inches from the floor, so you will not be dropping anything heavy from high heights. This makes it useful for accumulating volume late in a session when fatigue is already high but the risk of injury in that fatigued state needs to stay low.
Balances Pressing Volumes
Anyone who benches frequently creates an imbalance between the pressing and pulling muscles of the upper body. Rows counteract that by training the posterior chain of the shoulder girdle — rear delts, rhomboids, traps. For a balanced upper body, there must be balance in your pushing and pulling training.
Chest Supported Dumbbell Row Variations
Single-Arm Chest Supported Row
Row one arm at a time while the other arm hangs. This unilateral approach lets you focus entirely on one side, use a slight torso rotation for increased range of motion, and directly compare left-side output to right-side output across sets.
Alternating Chest Supported Row
You can hold the dumbbells at the top of the rep and do an alternating row from the top-down, which is really challenging. This variation keeps constant tension in both sides of the back simultaneously while requiring coordination and grip endurance.
Paused Chest Supported Row
Hold the top position for 2 to 5 seconds on each rep. This eliminates any stretch reflex from assisting the pull, forces the rhomboids and mid-traps to sustain an isometric contraction under load, and dramatically increases the difficulty without touching the weight selection.
Slow Eccentric Chest Supported Row
Use a 3 to 4 second lowering on every rep. Slowing down the eccentric phase increases time under tension, which is a critical hypertrophy driver. This works particularly well in hypertrophy-focused phases where volume and mechanical stress matter more than moving heavier loads.
Chest Supported Rear Delt Row
Use lighter dumbbells and flare the elbows out to roughly 90 degrees from the torso. The pull is shorter, the motion is almost horizontal, and the rear delts take the majority of the load. This variation is not a substitute for the main movement — it is a complementary exercise for specifically targeting a muscle group that most people underwork.
How to Program Chest Supported Dumbbell Rows
Frequency
Training the chest supported row 1 to 2 times per week as part of a back-focused or pull day is appropriate for most people. If you train back twice a week, you could use the chest supported row in one session and a different row variation — like a bent-over row or cable row — in the other.
Sets and Reps by Goal
For muscle hypertrophy: Aim for 3 to 4 sets of 10 to 15 reps with a weight that makes the last 2 to 3 reps genuinely challenging.
For strength: You can do heavy sets of 5 or 6 reps, or knock out a 20-rep set, and everything in between — it really depends on what your training goals are.
For intermediate lifters: Progress to moderately challenging weights that allow 8 to 10 quality repetitions for 3 to 4 working sets.
Where in the Session to Place It
Programming chest supported dumbbell rows toward the end of back-focused workout days works well because it is a great variation for chasing a pump after heavier compound work is done. If you start with deadlifts or heavy barbell rows, finishing with chest supported rows lets you accumulate more back volume without the spinal loading risk of another heavy compound exercise.
Progressive Overload
Increase dumbbell weight when 12 reps become manageable with perfect form. You can also manipulate tempo by slowing down the eccentric phase to a 3 to 4 second lowering to increase time under tension. Adding isometric pauses of 1 to 2 seconds at peak contraction deepens the mind-muscle connection. Volume cycling by adding sets or using drop-set techniques intensifies the stimulus.
Using Lifting Straps
Your back is typically stronger than your grip. Do not hesitate to use lifting straps if necessary. Most people can do significantly more reps or use heavier weights if they use lifting straps, which means a better training effect for the back. Straps are not a weakness — they are a tool for keeping the grip from being the limiting factor when the goal is back development.
Chest Supported Dumbbell Row vs Bent-Over Row
These two exercises train the same general movement pattern but differ in ways that matter for programming decisions.
The bent-over row requires the spinal erectors, glutes, and hamstrings to actively stabilize the body throughout every set. That makes it a more demanding exercise overall but also means the back muscles are competing with postural muscles for attention. The chest supported row removes that competition entirely.
Chest-supported rows provide more stability and target the upper and mid-back muscles while reducing lower back strain. Bent-over rows are a compound exercise that engages the entire posterior chain but requires greater core stability.
If you are fresh and want to move heavy weight through a demanding pattern that also trains the whole posterior chain, the bent-over row is the better choice. If you have already done heavy compound work and want to maximize isolated back volume with low spinal cost, the chest supported row wins.
Using both in a well-designed program is more productive than picking one and abandoning the other.
Who Benefits Most From This Exercise
Beginners: The bench provides immediate feedback about body position, and the inability to use momentum forces correct movement patterns from the start. It is a safer introduction to rowing mechanics than the bent-over variation.
People with lower back problems: Anyone who cannot safely hinge at the hip under load — whether from injury, limited flexibility, or cumulative spinal fatigue — can still train their back hard with this exercise.
Intermediate and advanced lifters: High-volume back training often accumulates spinal load quickly. Adding chest supported rows to a program that already includes deadlifts and barbell rows provides more back training stimulus without stacking additional lumbar stress.
Anyone with a push-pull imbalance: If you press more than you pull — which describes most people who train in commercial gyms — your shoulder health depends on consistent rowing volume. This exercise makes that volume easy to accumulate without technical complexity.
Tips to Get More Out of Every Set
Use a false grip when the biceps take over. If your arms fatigue before your back does, try not wrapping the thumb around the dumbbell. This reduces the grip’s contribution to the pull and forces more of the load onto the back. It feels awkward at first but works.
Film yourself from the side. What you feel during a set and what is actually happening often diverge, especially with the chest. A side-view video catches the bench contact problem immediately.
Pull to different target points on different sets. Rowing the dumbbells toward your lower ribcage emphasizes the lats. Rowing them toward your upper waist with elbows slightly out shifts more emphasis to the upper back and rear delts. Deliberately varying the endpoint across sets is a low-effort way to hit slightly different portions of the back within the same exercise.
Let the scapulae move fully. You can let your scapula slide forward at the bottom of the movement and squeeze it back in the top position — just make sure to keep the movement controlled. Locking the shoulder blades in place and only moving through the elbow reduces the range of motion and leaves the rhomboids and traps underdeveloped.
Frequently Asked Questions (FAQs)
What angle should I set the bench for chest supported dumbbell rows?
Start at 30 to 35 degrees for most people. The most important thing is having enough room to fully extend your arms at the bottom of each rep — use that as your baseline, then adjust slightly up or down based on comfort. A lower angle biases the lats; a higher angle brings in more upper traps and rear delts.
How much weight should I use for chest supported dumbbell rows?
Less than you think. Because momentum is removed, your effective load drops compared to bent-over rows. Choose moderate weights that allow strict form for 8 to 12 reps. Because momentum is eliminated, loads may be lighter than bent-over rows. If your chest comes off the bench at any point during the set, the weight is too heavy.
Can I do chest supported dumbbell rows if I have lower back pain?
Generally yes, which is one of the main reasons this variation exists. In this chest-supported version, you remove some stress from your lower back, and can fully focus on activating your lats and trapezius. That said, if you have an acute injury or significant pain, consult a physiotherapist before adding any new exercise.
Are chest supported rows better than bent-over rows for back development?
Neither is categorically better — they serve different purposes within a program. Bent-over rows allow heavier loading and train the posterior chain more comprehensively. Chest supported rows produce more isolated back stimulus with less spinal stress. Using both is the strongest approach for long-term back development.
How often should I do chest supported dumbbell rows?
One to two times per week is appropriate for most training levels. Treat them as a secondary row movement after heavier compound lifts, or as the primary row variation on lighter training days. Back muscles recover well with frequent training, provided the total volume per week is managed appropriately.
Why do I feel chest supported rows more in my arms than my back?
This usually means the biceps are initiating the pull instead of the shoulder blades. If you feel your biceps being overused and your back remaining underactive, consider utilizing a false grip — meaning you do not wrap the thumb around the dumbbell. Also try initiating every rep by squeezing the shoulder blades before bending the elbow.
Should I use lifting straps for chest supported dumbbell rows?
If your grip is limiting your sets before your back is adequately fatigued, yes. The purpose of the exercise is to train the back, not to test grip endurance. Straps allow you to reach the rep ranges and load levels where the target muscles actually receive sufficient stimulus.
Can I do chest supported dumbbell rows without a bench?
You need something to rest your chest on. Alternatives include a stability ball, a stacked set of gym mats, or a box at the right height. Anything you can rest your chest on with an arm hanging to the side would work. The critical requirement is that both arms have clearance to hang and pull without hitting the support surface.
What is the difference between a neutral grip and an overhand grip for this exercise?
A neutral grip provides more brachioradialis and lat involvement, while a pronated overhand grip shifts emphasis slightly toward rhomboid and trap activation. The neutral grip is more comfortable for most people’s shoulders and is the standard starting point. Try both across different training phases and stick with whichever produces better back engagement for you specifically.
How do I know if I am using good form on chest supported rows?
Three checkpoints: your chest stays in contact with the pad for the entire set; your shoulder blades fully retract at the top and fully spread at the bottom; and the dumbbells travel in a horizontal arc toward your ribcage rather than angling up toward your shoulders. If all three are happening, your form is solid.
In conclusion
The chest supported dumbbell row is not complicated, but it demands honest effort. There is no way to borrow momentum from the hips, no way to disguise bad reps with a dramatic torso lean. You row, your back works, and over time it gets thicker and stronger. That is a rare thing in gym exercises — a movement where the feedback is immediate and the results are hard to fake.
Set the bench between 30 and 35 degrees. Press your chest firmly into the pad. Let the arms hang, set the shoulder blades, and drive the elbows toward your hips with control in both directions. Two to three seconds on the way down. A real pause at the top. Repeat that honestly across three to four sets, two days a week, and the results follow.
The back is one of the most rewarding muscle groups to develop — and it is also one of the most commonly undertrained. This exercise addresses that gap without requiring a cable tower, a machine, or a spotter. Just two dumbbells and an adjustable bench.
Want to build a stronger, more balanced back? Check out How to Do Single Arm Dumbbell Row for proper form, key benefits, and tips to target your lats and improve muscle symmetry.