
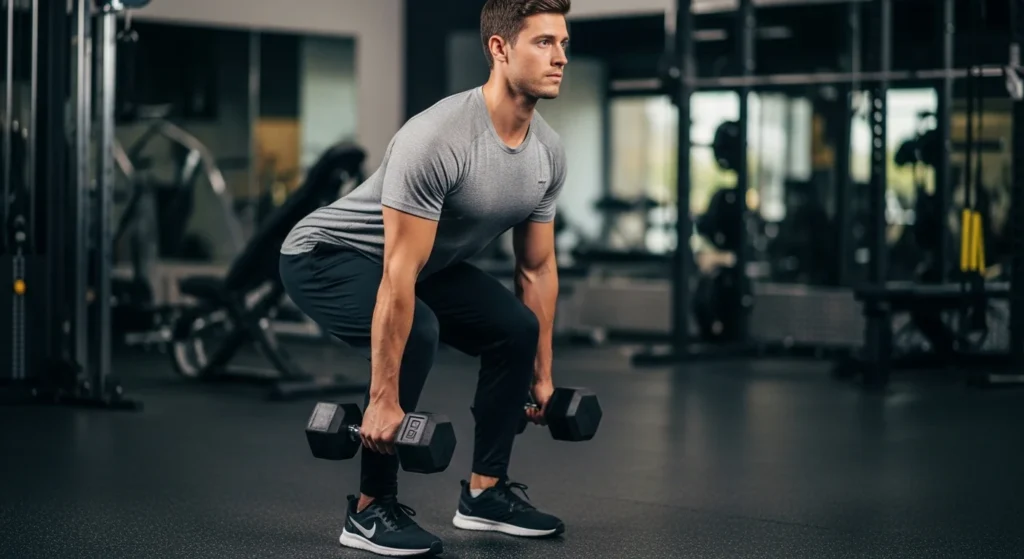
If you have been splitting your deadlifts and rows into separate sessions, you are leaving real gains behind. The dumbbell deadlift to row chains two foundational pulling movements into a single fluid sequence. This is not some trendy hybrid lift invented to fill Instagram reels. It is a biomechanically sound compound exercise that coaches have used for years to simultaneously develop strength, posture, and athleticism.
What Is the Dumbbell Deadlift to Row?
The dumbbell deadlift to row is a compound, multi-joint exercise that joins a hip hinge pattern directly into a horizontal pull within a single repetition. You hinge forward while lowering the dumbbells toward the floor, row the weights toward your torso while still in the hinged position, and then return to standing. Every rep visits both movements.
Two main versions get trained under this name:
Conventional Dumbbell Deadlift to Row: The knees bend more deeply, the dumbbells travel from below the knees, and the row is performed near the bottom of the pull. The hinge depth is greater, loading the lower back and posterior chain through a fuller range of motion.
Romanian Deadlift (RDL) to Row: The hips drive backward with minimal knee bend, creating a pronounced stretch on the hamstrings. The torso reaches near-parallel to the floor, and the row is performed from there. This version places a heavier eccentric load on the hamstrings and tends to produce more intense lower-body stimulus.
Both are legitimate. The RDL variation gets programmed more often because the torso position at the bottom of an RDL — nearly parallel to the floor — is exactly where you want to be for an effective bent-over row. The transition between movements is smooth rather than awkward.
Muscles Worked in the Dumbbell Deadlift to Row
Primary Muscles
Hamstrings: The hamstrings load eccentrically during the descent and fire as primary hip extensors when you drive back to standing. That eccentric phase — the stretch under load — is where meaningful hypertrophy stimulus lives, and this exercise delivers it on every rep.
Glutes (Gluteus Maximus): The glutes power the hip extension that brings you from the hinged position back to upright. Squeezing them hard at the top of every rep maximizes activation and develops the full, powerful glute development that carries over to sprinting, jumping, and lifting.
Latissimus Dorsi: The lats drive the row. They pull the upper arm toward the torso, creating both the width and the thickness that distinguish a well-trained back. Driving the elbow backward — rather than hoisting the hand upward — keeps the lats leading rather than handing the work over to the biceps.
Trapezius (Mid and Lower Traps): The mid traps retract the shoulder blades at the peak of the row. The lower traps hold the scapula down and prevent the shoulders from riding up toward the ears. Both are critical for healthy shoulder mechanics and for the postural strength that most desk-bound adults genuinely lack.
Rhomboids: These sit between the spine and the shoulder blades, working alongside the mid traps to create the “squeeze” sensation at the top of every row. Weak rhomboids are directly linked to the forward-rounded shoulders that plague people who sit for a living.
Secondary Muscles
Erector Spinae: These deep spinal extensors run along either side of the spine and work isometrically throughout the movement to hold a neutral back position. They bear more load as the torso angle approaches parallel.
Core (Transverse Abdominis, Obliques): The core braces against spinal flexion during the hinge and resists rotation during the row. Without it, the lower back rounds — the most common breakdown point in this exercise.
Rear Deltoids: The posterior deltoid assists the rhomboids and traps in driving the arm into extension. Rowing with the elbow slightly wider engages the rear delts more; rowing with a tighter elbow path emphasizes the lats.
Biceps Brachii and Brachialis: The elbow flexors help complete the row but should never initiate it. The back muscles start the pull; the arms finish it. Higher rep sets accumulate meaningful arm volume as a byproduct.
Grip Muscles: Holding loaded dumbbells through the full arc of a deadlift and a row builds grip strength steadily, with carryover to barbell pulling, pull-ups, and carries.
How to Do the Dumbbell Deadlift to Row: Step-by-Step
Equipment
A pair of dumbbells. Nothing else is required. Beginners typically start with 10–20 lbs per hand, intermediate trainees work in the 25–45 lb range, and experienced lifters push higher once the mechanics are genuinely dialed in. If you are not sure where to start, go lighter than you think you need to.
The Starting Position
Stand with your feet hip-width to shoulder-width apart. Hold a dumbbell in each hand with either a neutral grip (palms facing each other) or a pronated grip (palms facing you). Let the dumbbells hang in front of your thighs. Breathe into your belly — not your chest — and brace your core like you expect to take a hit. Retract the shoulder blades slightly to engage the lats before the movement begins.
Phase 1: The Hip Hinge (Deadlift Descent)
Drive the hips backward, not downward. Your hips should travel toward the wall behind you rather than your knees bending toward the floor. Maintain a soft knee bend throughout. As the hips move back, the torso tips forward and the dumbbells track down the front of your legs. The spine stays neutral — its natural S-curve remains intact, not flattened and absolutely not rounded at the lumbar region.
For the RDL variation, descend until the torso is roughly parallel to the floor and you feel a deep hamstring stretch. For the conventional variation, allow the knees to bend more and the dumbbells to travel closer to the floor. Keep the weights within an inch or two of your shins at all times — when they drift forward, the moment arm on your lower back increases considerably.
Phase 2: The Row
From the hinged position, drive the elbows backward and upward while keeping them tucked close to the torso. Think about pulling your elbows toward the ceiling behind you — not lifting your hands toward your chest. The dumbbells should finish near your lower ribcage or upper hip, not at your collarbone. Pulling toward the hip loads the lats; pulling toward the chest shifts the work into the biceps.
At the top of the row, pull the shoulder blades together and hold briefly. The shoulders stay down. Lower the dumbbells under control to the hanging position.
Phase 3: Return to Standing
After completing the row and lowering the dumbbells back to the hinged position, drive the hips forward and press through the mid-foot to stand tall. Squeeze the glutes at lockout. Do not hyperextend the lower back — a straight, strong posture with the glutes actively contracted is the target.
That is one rep. Exhale at the top, reset your breath, and repeat.
Breathing
Inhale and brace before the descent. Hold the brace through the hinge and the row. Exhale at the top of the rep as you return to standing. This intra-abdominal pressure protects the spine under load and becomes increasingly important as weights increase.
Common Mistakes and How to Fix Them
Rounding the Lower Back
The most frequently seen error and the most dangerous. Spinal rounding under load increases pressure on the intervertebral discs and puts the erector spinae at a mechanical disadvantage. Two things cause it: too much weight and insufficient core engagement. The fix is using a load that lets you maintain a neutral spine throughout — visualize a straight line from the back of your skull to your tailbone, and keep it.
Letting the Dumbbells Drift Forward
When the dumbbells swing away from the body during the descent, the lever arm on the lower back grows. Keep the weights tracking close to your legs throughout the hinge.
Pulling with the Biceps Instead of the Back
If the row is felt mainly in the arms, elbow flexion is initiating the pull rather than shoulder extension. Treat your hands as hooks and focus on driving the elbows backward. The biceps will contribute without being the primary movers.
Shrugging the Shoulders
Allowing the shoulders to rise toward the ears shifts work from the mid traps and rhomboids to the upper traps. Pack the shoulders down before initiating the pull and hold that position through the full range of motion.
Turning the Hinge Into a Squat
When the knees bend too deeply, the exercise shifts from a hip hinge to a partial squat. The hamstrings lose their stretch and the exercise loses its stimulus. Cue yourself to push the hips backward rather than bend the knees downward.
Using Momentum
Swinging the dumbbells with momentum to clear the row removes tension from the target muscles and redirects stress into the joints. The weight is too heavy if this is happening consistently.
Elbow Flare
Wide elbows during the row internally rotate the shoulder joint, which creates impingement risk over repeated training cycles. Elbows track backward, close to the sides.
Programming the Dumbbell Deadlift to Row
Who Should Use This Exercise
This movement suits a wide range of people. Beginners benefit from learning the hip hinge and horizontal pull together as a connected system rather than as isolated drills. Intermediate and advanced lifters can use it as a time-efficient compound accessory or as the primary posterior chain lift in a minimalist home or travel setup. Athletes training for sport get direct carryover through the combination of hip extension power and upper-back pulling strength — both of which appear in throwing, rowing, sprinting, and any pulling activity.
Sets and Reps by Goal
For muscle hypertrophy, 3–4 sets of 8–12 reps with a load that makes the final two reps genuinely difficult produces reliable results. Using 65–75% of maximum effort in this rep range drives the metabolic and mechanical tension that stimulates growth.
For strength, 3–5 sets of 4–6 reps with heavier loads progressively overload the posterior chain and upper back. The lower rep range demands higher relative intensity.
For muscular endurance or fat-loss phases, 2–3 sets of 12–20 reps with shorter rest periods (30–60 seconds) stresses both the muscles and the cardiovascular system.
Placement in a Program
This exercise works on pull days, back days, full-body days, or as a main accessory after compound work like the barbell deadlift or squat. It pairs naturally with pressing movements — bench press, overhead press — for antagonist balance. Rest 60–90 seconds between sets for hypertrophy work, 2–3 minutes for strength-focused sets.
Training this movement 2–3 times per week with at least 48 hours between sessions allows adequate posterior chain recovery.
Progression
Start with a weight that lets you complete every rep with clean mechanics. Add 2.5–5 lbs per side every one to two weeks as long as form holds. When the weight becomes challenging, slow the eccentric phase to 2–3 seconds before adding more load. A pause at the bottom of the hinge or the top of the row increases time under tension without requiring heavier dumbbells.
Dumbbell Deadlift to Row Variations
Single-Leg Dumbbell Deadlift to Row
Performed on one leg, this variation increases demands on glute stability, balance, and lateral hip strength dramatically. Hold one or two dumbbells, balance on one foot, hinge to parallel keeping the hips square, row, and return to standing. It reveals and corrects side-to-side strength asymmetries and forces the core to work against rotation throughout every rep.
Kickstand (Staggered Stance) Dumbbell Deadlift to Row
Place one foot slightly behind the other with the toe touching the floor for balance, and load most of your bodyweight into the front leg. This step between bilateral and single-leg training builds unilateral strength without demanding the balance of a full one-legged variation — a useful bridge for those still developing hip stability.
Dumbbell Sumo Deadlift to Row
A wider stance with toes angled outward changes the loading pattern, bringing the inner thighs and glute medius into the picture while reducing hamstring involvement slightly. This setup often works better for lifters with limited hamstring flexibility who struggle to reach the hinged position without rounding.
Dumbbell Deadlift to Upright Row
Rather than rowing toward the hip with elbows traveling backward, the upright row version pulls the dumbbells toward the chin with the elbows flaring wide. This targets the upper traps and medial deltoids instead of the lats and rhomboids — a fundamentally different pull pattern that shares the same deadlift initiation. Lifters with shoulder impingement should approach this variation cautiously, as the arm position narrows the subacromial space.
Tempo Dumbbell Deadlift to Row
Identical movement, deliberately slower speed. Lowering for 3–4 seconds on the descent and pausing for 2 seconds in the hinged position before rowing extends time under tension considerably without requiring heavier weights. This is practical when you have reached the upper limit of available dumbbell loads and need to progress without equipment constraints.
Dumbbell RDL Row with Pause
A deliberate 2-second pause at the bottom of the hinge, before initiating the row, eliminates momentum and forces the posterior chain to work from a dead stop. It sharpens awareness of the hinged position and builds the bottom-end strength that transfers directly to barbell deadlift performance.
Benefits Worth Knowing
Time Efficiency
Two movement patterns, one exercise. The same posterior chain and upper back stimulus accomplished in roughly half the training time. For people with real schedule constraints, this matters.
Corrects Side-to-Side Imbalances
Barbell exercises can mask strength differences because the dominant side compensates without anyone noticing. Dumbbells force each limb to work independently, making asymmetries visible and giving the weaker side no option but to catch up.
Improved Posture
Strengthening the upper back pulling muscles — rhomboids, mid traps, rear delts — directly counteracts the forward-rounded shoulder posture that develops from prolonged sitting. Simultaneously, stronger glutes and hamstrings support healthier pelvic alignment. The postural improvements are not incidental; they are a direct result of making these specific muscles stronger.
Functional Strength Transfer
The hip hinge appears in lifting objects from the floor, loading the trunk for throws, and absorbing ground forces during sprinting. Training it alongside a horizontal pull develops the posterior chain as an integrated system — the way it actually has to function outside a gym.
Grip Strength
Holding loaded dumbbells through the full range of both movements builds grip progressively. This carries over to barbell pulling, pull-ups, carries, and tasks that nobody in strength training circles talks about but everyone encounters daily.
Minimal Equipment
A pair of dumbbells and floor space. No barbell, rack, or cable machine. Equally practical in a commercial gym, a garage, or a hotel.
Exercise Comparison Table
| Exercise | Primary Target | Equipment | Hinge Included | Bilateral/Unilateral |
|---|---|---|---|---|
| Dumbbell Deadlift to Row | Full posterior chain + upper back | Dumbbells | Yes, dynamic | Both |
| Bent-Over Barbell Row | Upper back, lats | Barbell | Held position only | Bilateral |
| Single-Arm Dumbbell Row | Lats, rhomboids | Dumbbell + bench | No | Unilateral |
| Romanian Deadlift | Hamstrings, glutes | Any | Yes | Both |
| Renegade Row | Core, lats | Dumbbells | No | Alternating |
| Rack Pull | Lower back, traps | Barbell, rack | Partial | Bilateral |
The dumbbell deadlift to row is the only option in this table that combines a full, dynamic hip hinge with a horizontal pull in a single dumbbell movement. That is what makes it unusual — and worth the space it takes in a program.
Sample Full-Body Dumbbell Workout
3 Days Per Week, Non-Consecutive
A1. Dumbbell Deadlift to Row — 4 sets x 10 reps, 90-second rest A2. Dumbbell Goblet Squat — 4 sets x 12 reps, 90-second rest B1. Dumbbell Overhead Press — 3 sets x 10 reps, 60-second rest B2. Single-Leg Dumbbell RDL — 3 sets x 8 reps per side, 60-second rest C1. Dumbbell Farmers Carry — 3 x 30 meters, 60-second rest
The deadlift to row anchors the pull volume in this session. The goblet squat and single-leg RDL handle lower body from two different angles. The overhead press balances the horizontal pull with a vertical push. The farmers carry finishes with grip and loaded carry work. Nothing here is redundant.
Coach-Level Tips
The row portion of this exercise is as much an anti-rotation drill as it is a back exercise. The torso must resist twisting as the dumbbells are pulled, requiring the obliques and deep stabilizers to fire alongside the primary movers. When you feel your shoulder rotating toward the ceiling as you row, the weight is too heavy or you are not bracing adequately.
Lifting straps let the back muscles reach meaningful fatigue without grip becoming the limiting factor. For general fitness, training without straps is fine and builds grip. For maximum back hypertrophy, straps allow heavier loading and more productive volume on the muscles that actually matter for this movement.
The false grip — holding the dumbbell without wrapping the thumb — reduces how much the biceps can contribute to the pull and forces the back to handle more of the work. This works well for lifters who consistently feel rows in their arms rather than their back and want a simple technical adjustment before changing anything else.
Frequently Asked Questions (FAQs)
How is the dumbbell deadlift to row different from just doing a bent-over row?
A standard bent-over row requires holding a static hinged position for the duration of the set. The deadlift to row moves in and out of the hinge on every rep, dynamically loading the hamstrings and glutes rather than keeping them isometrically braced. The posterior chain works considerably harder as a result, and the metabolic demand of the full movement is higher.
Can beginners do the dumbbell deadlift to row?
Yes, with appropriate weight selection and patience with the pattern. Practicing the hip hinge and the bent-over row separately for a few weeks before combining them is time well spent. Start light — the goal early on is to own the movement, not to challenge the muscles heavily.
Should I use the RDL version or the conventional version?
If hamstring development and posterior chain hypertrophy are priorities, the RDL version is the better choice — it creates a longer hamstring stretch and positions the torso ideally for the row. If you have limited hamstring flexibility or are working on general pulling strength, the conventional variation with more knee bend is more accessible.
How heavy should I go?
Heavy enough that the last two reps of each set are genuinely difficult with form still intact. If form breaks before the final reps, the weight is too heavy. A useful general benchmark: many coaches suggest that a solid working weight for the row component is roughly half your bodyweight per dumbbell, but individual mechanics and training history vary too much to treat that as a rule.
How many times per week should I train this?
Two to three times per week with at least 48 hours between sessions targeting the posterior chain. If you are using heavy loads and treating it as a primary strength movement, twice per week is more appropriate.
Is this safe for people with lower back issues?
Spinal health varies significantly between individuals, and anyone with a diagnosed condition should consult a physiotherapist or sports medicine professional before loading this pattern. For people with general tightness from prolonged sitting, properly performed hip hinge exercises with moderate loads often strengthen the posterior chain in ways that reduce discomfort over time. Start light, maintain a neutral spine, and stop immediately if pain rather than general muscle fatigue occurs.
What is the difference between the deadlift to row and the deadlift to upright row?
Entirely different upper-body patterns. The bent-over row sends the elbows backward toward the hips, targeting the lats, rhomboids, and mid traps. The upright row sends the elbows wide and upward toward chin height, targeting the upper traps and medial deltoids. Same deadlift initiation, completely different pulling mechanics.
Can I use this for fat loss?
Exercises that recruit large muscle groups across the full body raise calorie expenditure during training and build the lean mass that elevates resting metabolic rate over time. The dumbbell deadlift to row does both. Using shorter rest periods (30–45 seconds) in a circuit format increases cardiovascular demand considerably if that is the training goal.
Do I need lifting straps?
No, but they help for heavier work. For most purposes, the grip training is a useful byproduct of holding the dumbbells through the full movement. If your grip consistently gives out before your back muscles are adequately fatigued, straps allow you to direct the training stimulus where it belongs.
What muscles does this exercise NOT train?
The anterior chain — quadriceps, hip flexors, chest, and front deltoids — receives little direct stimulus here. A complete program pairs the dumbbell deadlift to row with a squat pattern for the anterior lower body and a pressing movement for the anterior upper body.
In conclusion
The dumbbell deadlift to row is two foundational movements — the hip hinge and the horizontal pull — combined into a single rep that trains the body as the connected system it actually is. Done consistently with clean mechanics, it builds the hamstrings, glutes, lats, traps, rhomboids, rear delts, core, and grip in one exercise. The postural improvements are real. The functional carry-over is real. The time efficiency is a genuine advantage.
The form principles do not have options: neutral spine, hips hinge back not down, elbows track toward the hip not the chest, core stays braced from setup to lockout. Everything else — the variation, the weight, the frequency — adjusts to your experience level and goals. Start with the RDL variation at a moderate load, learn the mechanics, and add weight with patience. Compound movements built on clean technique accumulate results faster than heavy lifts built on broken patterns.
Want to build a stronger, wider, and more defined back? Check out these 9 Best Dumbbell Back Workouts to Build Your Back for effective exercises and complete training guidance.


