Most people who train lower body have heard about glute bridges. Fewer actually do them correctly. And even fewer know how to load them with a dumbbell in a way that produces real, measurable strength and size gains over time. That gap is what this guide is for.
Whether you are new to resistance training, coming back from an injury, or just looking to build a stronger posterior chain without needing a barbell and a bench, the dumbbell glute bridge deserves a place in your program.
What Is a Dumbbell Glute Bridge?
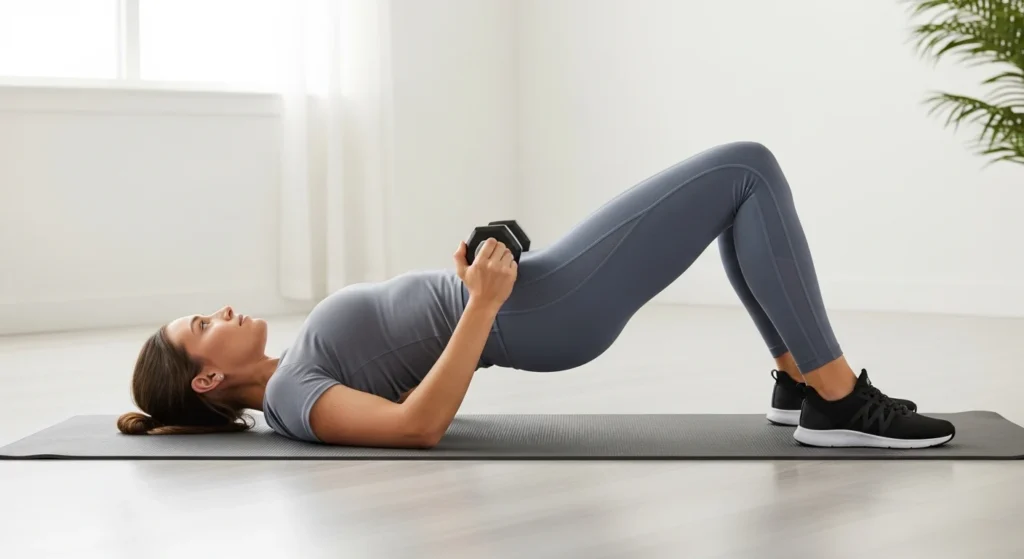
A dumbbell glute bridge is a weighted variation of the classic floor glute bridge. Instead of relying on your bodyweight alone, you hold a dumbbell across your hips to add resistance as you drive your pelvis toward the ceiling. The movement is performed lying flat on your back with your knees bent, feet flat on the floor, and the dumbbell secured with both hands across the hip crease.
The glute bridge and the hip thrust are often confused, but they are not the same exercise. In a glute bridge, your shoulders stay on the floor throughout the movement, which limits the range of motion. In a hip thrust, your upper back is elevated on a bench, which allows your hips to drop lower at the bottom and reach full extension at the top. That additional range of motion is why hip thrusts tend to produce more glute activation under heavy loads — but that does not make the glute bridge inferior. It makes it different, and in several situations, more practical.
Muscles Worked by the Dumbbell Glute Bridge
Gluteus Maximus
The gluteus maximus is the primary driver of this movement. It is the largest muscle in the body and the one most responsible for hip extension — the action of pushing your hips forward and upward. When you squeeze at the top of a dumbbell glute bridge, that contraction comes almost entirely from the gluteus maximus.
Research published in the Journal of Strength and Conditioning Research confirmed that glute bridges effectively activate the gluteus maximus, making them a practical choice for posterior chain development. A 2022 study published in PubMed comparing the barbell glute bridge to the barbell hip thrust found that the glute bridge actually produced greater mean and peak gluteus maximus activation than the hip thrust, despite having a shorter range of motion.
Gluteus Medius
The gluteus medius, located on the outer hip, works as a stabilizer during the movement. If you add a resistance band around your thighs while performing the glute bridge, medius activation increases significantly. Research shows that isometric hip abduction against a band during the bridge substantially increases gluteus maximus and medius activity compared to the unresisted version.
Hamstrings
Your hamstrings assist during hip extension and act as knee flexors that help hold your feet in position throughout the lift. If you place your feet too far from your body, the hamstrings begin to compensate for the glutes and may cramp, especially in the single-leg variation. Keeping your heels closer to your hips — roughly six to eight inches from your glutes — shifts more of the load back onto the glutes where it belongs.
Core and Spinal Stabilizers
Maintaining a neutral spine throughout the movement requires your transverse abdominis, internal obliques, and erector spinae to stay engaged. Using a light abdominal drawing-in maneuver — gently pulling the lower abdomen away from your waistband without forcefully bracing — combined with consciously squeezing the glutes has been shown to increase gluteus maximus activation and reduce excessive erector spinae activity, particularly in people with lower back pain.
Secondary Movers
The quadriceps contribute lightly to knee stability, and the adductors help keep the knees from collapsing inward during the bridge. These are not primary contributors, but they are active.
Why the Dumbbell Glute Bridge Belongs in Your Training
It Is Low Impact Without Being Low Value
Unlike squats, lunges, or deadlifts, the dumbbell glute bridge does not compress the spine or load the knee joints under tension. This makes it genuinely suitable for people managing lower back issues, knee pain, or early-stage rehabilitation. The glutes can be loaded and strengthened without placing undue stress on the surrounding structures. Research by Contreras et al. found that hip extension exercises like the glute bridge complement squats by reinforcing posterior chain strength, and can serve as a productive alternative during periods of injury.
It Builds Functional Hip Extension Strength
Hip extension power underlies sprinting, jumping, climbing stairs, and rising from a chair. Strengthening the gluteus maximus through isolated, loaded hip extension translates directly to better athletic output. Weak or inactive glutes often cause compensatory patterns in the lower back and hamstrings — a chain reaction that shows up as chronic pain, reduced mobility, and poor performance in compound lifts.
It Corrects Muscular Imbalances
Many people who sit for long periods develop gluteal inhibition, a state where the glutes underactivate and the hip flexors become chronically shortened. The glute bridge directly addresses this by placing the glutes under load in a position that requires full contraction. Over time, consistent training helps restore normal motor patterns.
It Transitions You to Heavier Loading
Mastering the dumbbell glute bridge is a reliable path to barbell hip thrusts. The movement pattern, pelvic mechanics, and mind-muscle connection you build here transfer directly. Skipping this foundation often leads to technical breakdowns and lower back strain when lifters first attempt the hip thrust with a barbell.
It Produces Real Hypertrophy
Bodyweight glute bridges are useful for activation and warm-up, but they have a ceiling. Adding a dumbbell unlocks progressive overload — the core mechanism of muscle growth. With consistent increases in load or volume, the gluteus maximus responds by growing in both size and strength. For hypertrophy, aim for 8 to 12 repetitions per set with a weight that brings you close to failure on the last rep.
How to Do Dumbbell Glute Bridges: Step-by-Step
Equipment You Need
- A dumbbell of appropriate weight (more on this below)
- An exercise mat or carpeted surface for comfort
- Optional: a folded towel or foam pad to cushion the hip bones under heavier loads
Step 1: Set Up Your Position
Lie flat on your back with your knees bent and your feet flat on the floor. Your feet should be hip-width apart with toes pointed forward. Position your heels roughly six to eight inches from your glutes — close enough that you could almost touch them with your fingertips. Place your arms along your sides with palms facing down for stability.
Retract your shoulder blades slightly into the floor. This creates a stable upper body base and prevents the shoulders from rolling forward during the lift.
Step 2: Position the Dumbbell
Sit up slightly and place the dumbbell horizontally across your hip crease — right where your thighs meet your pelvis. Grip one end plate with each hand to prevent the dumbbell from rolling. If you are using a heavier dumbbell, a folded mat or small towel under the weight makes this considerably more comfortable.
Do not place the dumbbell on your lower abdomen or across the thigh. It needs to sit at the hip crease to apply force in the right direction and avoid discomfort when you drive your hips up.
Step 3: Brace and Initiate
Take a breath in. Perform a gentle abdominal draw-in by pulling your navel slightly toward your spine — this is not a forceful vacuum, just a light engagement. Tuck your pelvis under slightly to flatten your lower back before you begin the lift. This posterior pelvic tilt is critical for ensuring the glutes, rather than the spinal extensors, generate the movement.
Step 4: Drive Your Hips Up
Press through your heels — not the balls of your feet — and drive your hips toward the ceiling. Exhale as you lift. The movement should feel like you are pushing the floor away, not pulling yourself up. Continue until your body forms a straight line from your knees through your hips to your shoulders.
Do not overextend. Pushing your hips higher than a neutral line causes the lumbar spine to hyperextend, which transfers load to the lower back and reduces glute engagement. Stop when your body is parallel with the floor.
Step 5: Squeeze and Hold
At the top of the movement, squeeze your glutes as hard as you can for one to two seconds. This isometric contraction at peak hip extension is where a significant portion of the training stimulus comes from. Research confirms that verbal and tactile cues to consciously activate the glutes during bridging exercises increase EMG activity compared to performing the movement without intentional focus.
Step 6: Lower Under Control
Lower your hips back to the floor slowly and with control. Do not let them crash down. The eccentric phase — lowering — is where muscle damage and growth stimulus accumulate. A controlled two-second descent keeps the glutes under tension throughout the rep.
Step 7: Reset and Repeat
Once your hips touch the floor, reset your brace and begin the next repetition. Avoid bouncing out of the bottom position, as this eliminates the brief moment of muscular loading that makes each rep productive.
Common Mistakes and How to Fix Them
Driving Through the Toes Instead of the Heels
When you press through the toes, the quadriceps dominate the movement and the glutes disengage. You may complete the rep and feel nothing in your glutes afterward. The fix is simple: consciously press through your heels and try to keep your toes lightly lifted off the floor during the drive phase. This shifts activation decisively toward the hamstrings and glutes.
Hyperextending the Lower Back at the Top
This is one of the most common form errors. It happens when people try to push their hips as high as possible, thinking more height equals more glute activation. In reality, driving past neutral causes the lumbar extensors to take over and increases injury risk. Stop when your shoulders, hips, and knees form a straight line.
Not Engaging the Core
Without an engaged core, the pelvis tends to tilt forward (anteriorly) during the lift, which compromises spine position and reduces glute contribution. Before every rep, check that your lower back is not arching away from the floor in the start position.
Letting the Knees Collapse Inward
Valgus collapse — knees caving toward each other — during the bridge reduces hip abductor and glute medius activation. Adding a light resistance band around the lower thighs is an effective cue and corrective tool. It forces you to maintain knee tracking over the toes throughout the set.
Placing Feet Too Far From the Hips
Foot placement matters more than people realize. When feet are too far out, the hamstrings are placed in a mechanically disadvantaged position and tend to cramp. Move your feet closer to your glutes until you find the position where you feel the most tension in your gluteus maximus at the top of the bridge.
Rushing the Repetitions
Performing glute bridges quickly reduces time under tension and diminishes the mind-muscle connection. This exercise is not about speed. A controlled, deliberate tempo — two seconds up, one second squeeze, two seconds down — produces far better results than banging out fast reps.
Placing the Dumbbell in the Wrong Spot
A dumbbell sitting on the lower abdomen provides minimal resistance to hip extension. A dumbbell sitting mid-thigh falls off when you lift. It needs to be at the hip crease — right where the thigh meets the pelvis — to provide the correct loading angle.
How Much Weight Should You Use?
This depends entirely on your training experience, your goal, and your body.
For beginners, starting with 10 to 20 pounds is reasonable. The priority in the first few weeks is learning the movement, establishing the mind-muscle connection, and developing consistent form. Using too much weight too soon causes compensatory patterns that are harder to correct later.
For those training for hypertrophy, choose a dumbbell that allows 8 to 12 clean reps with good form, reaching near-failure on the last rep. Once you can complete 12 reps with a controlled tempo and good technique, add weight on the next session — typically 5-pound increments.
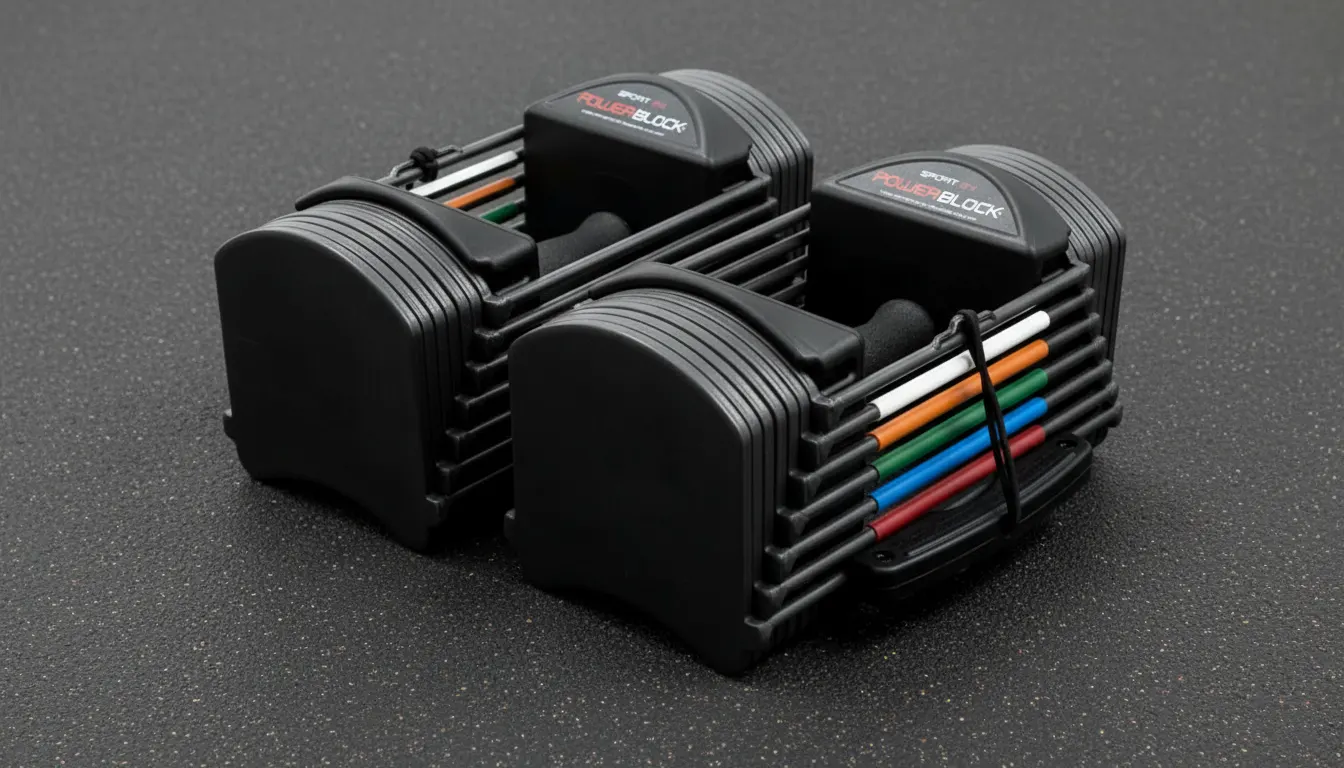
One practical limitation of the dumbbell glute bridge is that the glutes are exceptionally strong muscles. Many intermediate and advanced trainees outgrow the dumbbell relatively quickly, particularly because it becomes awkward and uncomfortable to position very heavy dumbbells at the hip crease. When this happens, two options present themselves: progress to the single-leg variation to double the effective load per leg, or transition to barbell glute bridges and hip thrusts, which accommodate much heavier loading.
A general guideline from PureGym: once you are working with more than 20 kilograms (approximately 44 pounds), the barbell may offer a more practical and comfortable loading option.
Breathing and Bracing
Breathe in before you initiate the bridge. Exhale as you drive your hips up. This pattern supports intra-abdominal pressure during the exertion phase and helps stabilize the spine. Never hold your breath for more than a rep or two, and avoid bearing down forcefully if you have high blood pressure or a hernia history.
Dumbbell Glute Bridge Variations
Single-Leg Dumbbell Glute Bridge
Perform the standard setup, then lift one leg and extend it straight so both thighs are parallel. Execute the bridge using only the planted leg. This unilateral variation roughly doubles the effective load per working leg, adds significant demand on the hip stabilizers and core, and helps identify and correct strength imbalances between sides. The gluteus medius works harder to keep the hips level throughout each rep.
Research from PubMed shows the single-leg bridge elicits a higher range of gluteus maximus EMG excitation (32.6 to 54.2 percent of maximum voluntary isometric contraction) than the bilateral version (16.4 to 41.5 percent). This makes it a meaningful progression even when the dumbbell weight stays the same.
Banded Dumbbell Glute Bridge
Place a light resistance band around your lower thighs, just above the knees, before performing the standard dumbbell bridge. The band creates inward force that you resist throughout the lift, recruiting the gluteus medius and hip external rotators more aggressively. Studies confirm that resisted hip abduction during bridging significantly increases gluteus maximus EMG activity compared to the unresisted version.
Elevated Dumbbell Glute Bridge
Place your feet on a stable box, bench, or step — elevated roughly 12 to 18 inches — and perform the dumbbell bridge from this position. The elevation increases the range of motion at the hip, producing a deeper stretch of the gluteus maximus at the bottom of each rep. Greater range of motion increases the mechanical work the muscle must perform per repetition.
Glute Bridge Hold (Isometric)
Drive your hips to the top position and hold for 20 to 30 seconds while maintaining a full glute squeeze and stable core. This isometric variation builds endurance in the glutes and spinal stabilizers. It is particularly useful as a warm-up tool before heavy lower body sessions or as a recovery-day option.
Glute Bridge March
Drive your hips up into the bridge position and hold. While maintaining full hip extension, alternate lifting one knee toward your chest, then the other — mimicking a marching motion. This challenges hip flexor control and core stability while keeping the glutes under sustained tension. It is a deceptively demanding variation that does not require any additional weight.
How to Program Dumbbell Glute Bridges
Frequency
Training the glutes with weighted bridges two to three times per week is effective for most people. Because the glutes are large, relatively resilient muscles, they recover well when given 48 hours between sessions. Avoid training the same muscle group on consecutive days, particularly if you are using meaningful resistance.
Sets and Reps by Goal
| Goal | Sets | Reps | Load |
|---|---|---|---|
| Glute Activation / Warm-Up | 2-3 | 15-20 | Light (bodyweight or very light dumbbell) |
| Hypertrophy (Muscle Building) | 3-4 | 8-12 | Challenging, near failure last rep |
| Strength | 3-5 | 5-8 | Heavy, controlled form |
| Endurance / Rehabilitation | 2-3 | 15-20+ | Light to moderate |
Where to Place It in a Workout
As a warm-up or activation drill, perform bodyweight or lightly loaded bridges before squats, deadlifts, or hip thrusts. The glute activation translates directly into better muscle recruitment during subsequent compound lifts.
As an accessory movement during a lower body session, place dumbbell glute bridges after your primary compound lifts. Three to four sets of 10 to 12 reps works well in this context.
As a standalone home workout exercise, dumbbell bridges pair well with Romanian deadlifts, Bulgarian split squats, clamshells, and lateral band walks for a complete posterior chain session.
Progressive Overload Strategy
Week 1-2: Establish form with a weight you can control for 3 sets of 10. Note how the last few reps feel.
Week 3-4: Add 2 to 3 reps to each set without changing the weight. Aim for 3 sets of 13.
Week 5: Add weight (typically 5 pounds) and return to 3 sets of 10.
Repeat this cycle. Over 8 to 12 weeks, consistent progression produces measurable increases in glute strength and visible changes in muscle development. With three sessions per week and consistent technique, most people notice meaningful strength improvements within four to six weeks.
Dumbbell Glute Bridge vs. Barbell Hip Thrust: When to Use Each
Both exercises train hip extension and target the gluteus maximus. Knowing which to use depends on your circumstances.
The dumbbell glute bridge makes more sense when you are new to resistance training and want to learn hip extension mechanics before adding complexity, you are working out at home without access to a barbell and bench, you are in a rehabilitation setting where minimal spinal loading is a priority, or you are using the exercise as a warm-up before compound lifts.
The barbell hip thrust makes more sense when you have outgrown the loading capacity of dumbbells, your primary goal is maximum glute hypertrophy and strength, or you have already mastered the glute bridge movement pattern and are ready to increase intensity significantly.
These exercises are not competitors — they can coexist in the same training program with different roles.
Sample Dumbbell Glute Bridge Workout (Home or Gym)
This routine works as a standalone lower body session or as accessory work within a larger program.
Dynamic Warm-Up: Leg swings, hip circles, and 2 sets of 15 bodyweight glute bridges.
Dumbbell Glute Bridge: 4 sets of 10 reps with a 2-second hold at the top and 2-second descent.
Single-Leg Dumbbell Glute Bridge: 3 sets of 10 reps per side.
Banded Glute Bridge (add band to the dumbbell bridge): 3 sets of 12 reps.
Glute Bridge Hold: 3 sets of 20-second holds.
Cool-Down: 20 to 30 seconds each of pigeon pose, hip flexor stretch, and hamstring stretch.
Safety and Injury Considerations
People with existing lower back pain may find the dumbbell glute bridge more comfortable than hip thrusts, specifically because the floor-based position limits the risk of lumbar hyperextension that can occur when the upper back is elevated on a bench. The shorter range of motion in the glute bridge leaves less room for the back to overextend.
If you have a hip flexor injury, modify the foot placement and range of motion until the pain resolves. If you feel any sharp pain in the knee during the lift, check that your heels are not too close to your glutes and that your knees track over your toes throughout the movement.
Always begin a session with a warm-up. Cold, tight hamstrings cramping during glute bridges — particularly the single-leg variation — is common and temporarily painful. Dynamic movements like hip circles and light bridges before adding weight resolve this in most cases.
Frequently Asked Questions (FAQs)
How is the dumbbell glute bridge different from a hip thrust?
The main difference is the position of the upper body. In a glute bridge, your shoulders remain on the floor, which limits hip range of motion. In a hip thrust, your shoulders are elevated on a bench, allowing your hips to drop lower and travel through a longer arc. Hip thrusts generally produce greater glute activation under heavy loads due to this extended range, but the dumbbell glute bridge is more accessible, easier to set up, and a better choice for beginners or home training.
Where exactly should I feel the dumbbell glute bridge?
You should feel the primary burn and tension in your gluteus maximus — the large muscle of the buttocks — and some secondary engagement in the hamstrings. If you feel it predominantly in your lower back, your hips are likely overextending at the top or your core is not braced. If you feel it mainly in your hamstrings, move your feet closer to your hips and focus on pressing through your heels.
How often should I do dumbbell glute bridges each week?
Two to three times per week is a reliable frequency for most training goals. Allow at least 48 hours between sessions targeting the same muscle group to give the glutes adequate time to recover and adapt. Glute bridges can also be performed daily at very light loads as activation work, without causing the recovery demands of a strength session.
Can I do dumbbell glute bridges every day?
Light, unloaded glute bridges can be used daily as a mobility and activation drill, particularly for people who sit for extended periods. Weighted dumbbell bridges used for strength or hypertrophy should not be performed on consecutive days for the same muscles. The muscle growth happens during recovery, not during the session itself.
What weight should a beginner start with for dumbbell glute bridges?
A 10 to 20 pound dumbbell is a reasonable starting range for most beginners. The first priority is mastering the movement pattern, establishing the mind-muscle connection with the glutes, and ensuring form does not break down. Starting too heavy leads to compensatory patterns that persist. Progress weight only once you can complete 12 clean reps with a 2-second squeeze at the top.
Why do I feel dumbbell glute bridges in my hamstrings more than my glutes?
This usually comes down to foot placement and heel drive. If your feet are too far from your body, the hamstrings are in a mechanically favorable position and take over. Bring your heels to within six to eight inches of your glutes. Actively focus on pressing through the heel and actively contracting the glutes at the top of each rep. The mind-muscle connection matters here — consciously squeezing the glutes during the movement measurably increases their activation compared to just going through the motions.
Is the dumbbell glute bridge suitable during pregnancy?
Lying flat on the back is generally not recommended after the first trimester due to potential pressure on the vena cava. Pregnant individuals should consult with their healthcare provider or a prenatal fitness specialist before continuing this exercise. Modified variations — such as performing the bridge on an incline — may be appropriate depending on trimester and individual circumstances.
How long before I see results from dumbbell glute bridges?
With three sessions per week and consistent progressive overload, measurable strength improvements typically appear within four to six weeks. Visible changes in glute size and shape generally take longer — eight to twelve weeks of consistent, well-programmed training is a reasonable expectation. Results depend on overall training volume, nutrition, recovery quality, and consistency.
Can dumbbell glute bridges replace hip thrusts entirely?
They can for beginners and home trainers, yes. The dumbbell glute bridge teaches the same movement pattern and produces meaningful glute development. The limitation is load — the glutes are strong muscles and most people eventually exceed the comfortable loading capacity of a single dumbbell. At that point, the barbell hip thrust allows for heavier progressive overload and becomes more practical for continued development.
Do I need a mat for dumbbell glute bridges?
A mat is not strictly necessary, but it significantly improves comfort, particularly for the upper back and tailbone. If you train on a hard floor, folding a towel or blanket under your upper back solves the problem. For the dumbbell itself, a small pad or rolled towel under the weight prevents it from pressing uncomfortably into the hip bones during heavier sets.
In conclusion
The dumbbell glute bridge is one of the more practical, accessible, and genuinely effective exercises for building lower body strength. It does not require a gym, a rack, or any complex setup. It targets the gluteus maximus with directness that squats and deadlifts simply cannot match, and it builds the hip extension mechanics that carry over into nearly every other lower body lift.
The key is not just doing the exercise — it is doing it with intentional form, progressive loading, and enough consistency to create actual adaptation. Drive through the heels. Squeeze at the top. Control the descent. Add weight when the current weight becomes manageable. That cycle, repeated over months, produces real results.
Start with a weight that lets you feel every rep. Progress from there.