
Most people who do dumbbell bent-over rows are doing them wrong. Not dangerously wrong, just wrong enough that they use their arms more than their back. They lose tension mid-set. Or they quietly grind their lower back without noticing.
Bent-over rows with dumbbells are one of the most productive pulling exercises you can do at home. They build thickness across the mid-back, develop the lats, and train the rear delts and biceps as secondary contributors. But the technique is more nuanced than most articles admit. The difference comes down to setup and body position. One row builds your back. The other mainly tires your arms.
What Is a Dumbbell Bent-Over Row?
A dumbbell bent-over row is a compound pulling exercise where you hinge at the hips, hold one or two dumbbells, and pull them toward your torso. It primarily targets the latissimus dorsi, rhomboids, and mid-traps, with secondary involvement from the rear deltoids, biceps, and spinal erectors.
It can be performed bilaterally or unilaterally. Both versions belong in training, but they are not interchangeable. Each has strengths and limits that matter based on your training stage.
Why Bent-Over Rows with Dumbbells Belong in Your Training
The back is one of the hardest muscle groups to train effectively at home, especially without a cable machine or pull-up bar. Dumbbells solve most of that problem.
Lat thickness and width: When you pull with a slight inward angle and retract at the top, the lats are the primary mover. Most people feel this in their biceps. They are not starting the pull from the right place. We will fix that in the technique section.
Mid-back density: The rhomboids and mid-traps fill out the space between your shoulder blades. You can’t build that look from pull-ups alone; you need rowing volume. Bent-over rows provide that.
Postural muscle endurance: Holding a hip hinge under load for 3–4 sets develops the spinal erectors and glutes in an isometric capacity. Over time, this improves posture and carries over to deadlifts, other hinge movements, and just standing comfortably without back fatigue.
Rear delt development: If you flare your elbows out slightly during the row, you increase rear delt activation. If you keep elbows tight to the ribs, you bias the lats more. Neither is wrong; it depends on your goal.
Honest limitation: Dumbbells cap out in weight faster than barbells. If you’re using a fixed 30 kg dumbbell in each hand and rowing well, you’re in solid territory. But beyond that load, most home setups hit a ceiling, and the barbell row starts to make more sense for continued strength development.
How to Do Dumbbell Bent-Over Rows: Step-by-Step
The Bilateral Stance
Step 1: Set your hip hinge: Stand with feet hip-width apart, hold a dumbbell in each hand at your sides. Push your hips back until your torso is roughly parallel to the floor. Your knees should have a slight bend, not a deep squat. This is a hinge, not a squat.
Step 2: Create a neutral spine: Before you pull anything, brace your core lightly, lift your chest slightly, and make sure your lower back isn’t rounding. A helpful cue: imagine someone has their hand between your shoulder blades, try to squeeze it without lifting your shoulders.
Step 3: Let the dumbbells hang, arms straight: Your starting position should have your arms fully extended, dumbbells below your chest, palms facing you (neutral grip) or facing behind you (supinated). Both grips work; neutral is typically more comfortable on the wrists.
Step 4: Initiate the pull from your elbow, not your hand: This is where most people lose the movement. Don’t think “pull the weight up.” Think “drive your elbow toward the wall behind you.” Your hand follows; it doesn’t lead. This small mental shift dramatically changes which muscles engage first.
Step 5: Pull to your lower ribs or hip: The dumbbell should end up near your hip or lower ribs, not your chest. Rows that end at the chest tend to involve a lot of bicep and shoulder elevation. Rows that end at the hip or ribs stay in the back.
Step 6: Pause briefly at the top: You don’t need a dramatic hold, but a half-second squeeze at the top helps establish the mind-muscle connection, especially when learning.
Step 7: Lower under control: The eccentric phase (lowering) is where a lot of hypertrophy work happens. Don’t drop the weight. Return slowly to the hang position before the next rep.
Key Coaching Cues That Actually Make a Difference
Common Mistakes and How to Fix Them
Mistake 1: Rounding the Lower Back Under Load
This is the big one. When the spinal erectors fatigue or the load is too heavy, the lower back rounds, the hips tip under, and you’ve turned a back exercise into a back injury waiting to happen.
Fix: Reduce load. Before adding weight, practice the hip hinge with no dumbbells. Stand 8 inches from a wall, push your hips back until they touch it, and keep your spine neutral. That’s your row position. Also: brace your core before each set, not just before each rep.
Mistake 2: Rowing to the Chest Instead of the Hip
This usually means you’re doing a partial upright row or a shoulder elevation. You’ll feel it in the traps and front delts instead of the mid-back.
Fix: Lower your elbows’ finishing point. Aim for hip/lower rib, not chest height. Think “pocket,” not “chest.”
Mistake 3: Using Too Much Bicep
If your biceps are the thing that’s sore the next day, that’s the signal. The bicep should be involved, but it shouldn’t be the primary contributor.
Fix: Wider grip, elbow-led initiation, and consciously thinking about squeezing your shoulder blade rather than curling your forearm.
Mistake 4: Not Maintaining Hip Hinge Throughout the Set
People set up correctly on rep one and slowly drift upright as the set continues. By rep eight, they’re nearly standing.
Fix: Record yourself from the side. Most people are shocked by how much they drift. Alternatively, set up with your back lightly brushing a wall or doorframe, it gives proprioceptive feedback.
Mistake 5: Shrugging at the Top
When you shrug, the upper trap takes over, and the mid-back work decreases. Shrugging also compresses the shoulder joint under load.
Fix: Focus on pulling the shoulder blade back (horizontal retraction), not up. Different movement, different muscles.
Bent Over Row with Dumbbells Variations
1. Single-Arm Dumbbell Row
Place one hand and the same-side knee on a bench or chair. Row with the opposite arm.
Why it matters: Removes the stability demand from the lower back, lets you focus on one side at a time, and generally allows heavier loading per arm. If you have lower back sensitivity, this is a better starting point. At home, a sturdy chair works fine for the supporting surface.
Limitation: It’s not a true bilateral exercise. You won’t develop the same bracing pattern as the bent-over version.
2. Bilateral Dumbbell Bent-Over Row
Both arms row simultaneously from a hip-hinge position.
Why it matters: More core and erector demand. More carryover to deadlifts and barbell rows. A true test of whether your hip hinge is solid.
Limitation: Lower back fatigue limits sets before upper back fatigue does, especially with beginners.
3. Neutral Grip vs. Supinated Grip Row
Neutral grip (palms facing each other) is easier on the wrists and elbows. Supinated grip (palms facing up) brings the biceps in more aggressively and tends to pull the elbows tighter to the torso, which biases the lats.
At home with adjustable dumbbells: The grip position is easy to switch between — just rotate your wrist. Try both and see which one you feel more in the back.
4. Chest-Supported Row (Floor or Incline)
Lie face-down on an incline bench (or prop yourself on a stack of books or cushions at home) and row from there. Eliminates lower back involvement.
Why it matters: Pure upper-back isolation. No hip hinge stability required. Great for higher rep work or when the lower back needs a break.
Home limitation: You need a surface angled around 30–45 degrees that supports your chest. An incline bench is ideal. Improvised setups work but can be uncomfortable for longer sets.
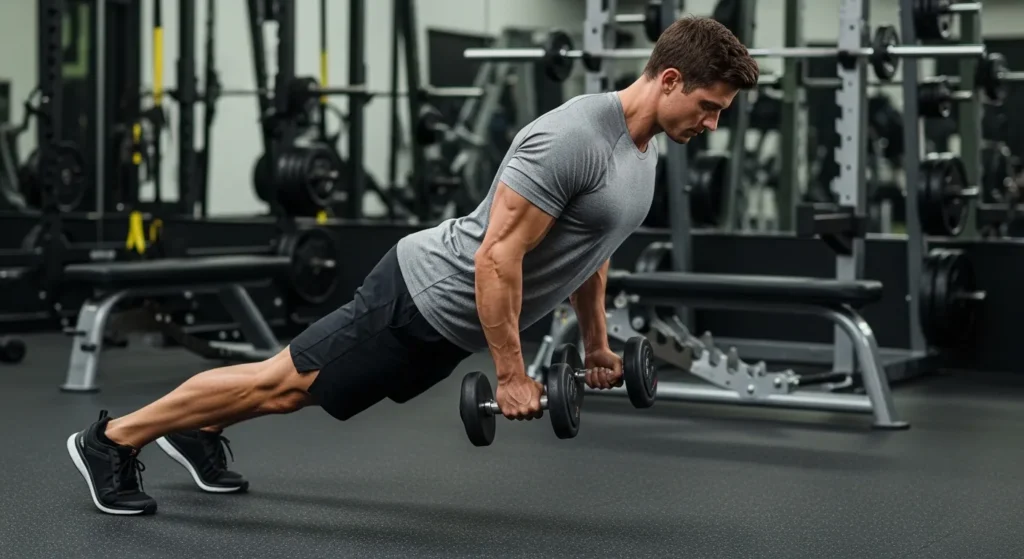
5. Renegade Row
Start in a push-up position holding dumbbells, row one arm at a time while the other arm holds the plank.
Why it matters: Adds serious core demand. Great for finishing sets or circuits.
Limitation: The core and shoulder stability demands often exceed the back training benefit for beginners. Don’t use this as your primary row movement early on; it’s a supplementary exercise.
Dumbbell Bent-Over-Row Benefits: What You Actually Get
Stronger lats and mid-back. With consistent, progressive loading, bent-over rows build the pulling muscles that most people neglect. This matters for posture, athletic performance, and injury prevention.
Balanced pressing-to-pulling ratio. Most home trainers do too much pressing (push-ups, bench press) and not enough pulling. Rows directly address that imbalance.
Grip strength development. Holding a heavy dumbbell through a full set of rows builds crushing grip strength, which carries over to almost everything.
Low equipment requirement. You need one or two dumbbells and floor space. That’s it. For home gym training, that’s as good as it gets.
Realistic expectation: Bent-over rows won’t give you a wide back on their own. Width primarily comes from lat pull-downs, pull-ups, and vertical pulling. Rows build thickness and density. Both matter, and they’re complementary.
Adjustable Dumbbell Considerations for Home Trainers
This matters more than most guides admit. If you’re using adjustable dumbbells,, there are real differences in how they behave during rows.
Selectorized dumbbells (e.g., Bowflex 552s): The length of the dumbbell is fixed regardless of weight. At lighter settings, there’s a lot of empty handle that can bump against your thigh or knee during the row. Be aware of your path, flare the elbows slightly outward to clear the dumbbell length if needed.
Spin-lock plate dumbbells: Heavier than selectorized dumbbells of the same weight because of the collars. The center of gravity shifts as you add plates. If you notice the dumbbell wobbling at the bottom of the row, check that the plates are balanced on both sides and the collars are tight.
Fixed hex dumbbells: These are the cleanest for rows. The grip is close to the center of mass, they’re predictable, and there’s no adjustment during your session. If your home gym has a set of fixed hex dumbbells, they’ll feel more stable than either of the adjustable options.
Bent Over Row with Dumbbells: Programming Advice
For beginners (0–6 months of consistent training): Start with the single-arm supported row to learn the movement without lower back fatigue interfering. 3 sets of 10–12 reps, moderate weight, where form holds cleanly through the last rep. Twice per week.
For intermediate trainees (6 months to 2+ years): Bilateral bent-over rows can replace or supplement single-arm work. 4 sets of 8–10 reps, heavier loads, with a focus on progressive overload. Add one working set every 3–4 weeks rather than jumping weight too fast. Once to twice per week, depending on your program structure.
Where they fit in a session: Rows are best placed after your heaviest compound movements (deadlifts, for example) but before isolation work. They’re a secondary compound — important, but not so taxing that they should come first unless back development is your specific priority.
Supersetting with push movements: Pairing rows with push-ups or dumbbell press creates an antagonist superset that reduces rest time without compromising performance. In a home workout where time is limited, this is a smart way to structure back and chest work.
Frequently Asked Questions (FAQs)
What muscles do bent-over rows with dumbbells work?
Primarily the latissimus dorsi, rhomboids, and mid-trapezius. Secondary contributors include the rear deltoids, biceps brachii, and spinal erectors (isometrically).
How heavy should I go for dumbbell bent-over rows?
Heavy enough that the last 2–3 reps of each set are genuinely hard, but not so heavy that form breaks down. If your lower back rounds or your torso rocks to complete reps, the load is too high. Most people need to drop weight the first time they prioritize clean form over load.
Should I do single-arm or both arms at once?
If you’re new to rows or have lower back sensitivity, start single-arm on a supported surface. Once you’re comfortable with the hip hinge and can maintain position under load, bilateral rows are worth adding. Both variations have long-term value — it’s not one or the other.
Why do I feel bent over rows in my biceps instead of my back?
Two main reasons: elbow path and initiation. If you’re initiating the pull by flexing your forearm (like a curl), the bicep does most of the work. Focus on driving your elbow backward first, and think about retracting your shoulder blade at the top. Reducing load also helps; you can’t focus on the motor pattern when you’re grinding through weight.
How many sets and reps should I do?
For hypertrophy (muscle building): 3–5 sets of 8–15 reps. For strength: 3–5 sets of 4–8 reps. Beginners tend to do well starting in the 10–12 rep range, where there’s enough volume for learning and adaptation.
Can I do bent-over rows every day?
Probably not — and there’s no good reason to. The back recovers well with 48–72 hours between sessions. Training rows twice per week with a day or more in between is sufficient for most goals and allows quality work rather than accumulated fatigue grinding down each session.
Are dumbbell bent-over rows good for fat loss?
Yes, but not because of some special fat-burning quality. Compound exercises that use large muscle groups burn more calories per set and build the muscle mass that raises metabolic rate. Rows contribute to that. They won’t spot-reduce anything, but they’re a smart inclusion in fat-loss programs.
What’s the difference between a dumbbell row and a barbell row?
Dumbbells allow a neutral grip, allow unilateral training (fixing imbalances), and require less loading to create the same stimulus early in training. Barbell rows allow much heavier loading over time and can be a better long-term strength builder. For home trainers, dumbbells are usually the more accessible and flexible option.
Conclusion
Bent-over dumbbell rows are one of the most effective back-building exercises you can do. You do not need a cable machine or pull-up bar. But like most compound movements, they’re easy to do casually and hard to do well.
The most common issues are not technique mysteries. They are the same three things for almost every lifter. The torso drifts upright during sets. Lifters start with the arm instead of the shoulder blade. Many use loads that are too heavy for clean form. Fix those, and the exercise delivers what it promises.
Start with the supported single-arm version if you’re new to rowing or if your lower back fatigues before your back muscles do. Graduate to bilateral work once the hip hinge feels stable. Prioritize feel over load. Back muscles are easy to bypass with moves that look like reps. But they do little useful work.
Progress is slow and honest with rows. Expect a few weeks before you reliably feel the right muscles engaging. That’s normal, and it’s worth the patience.
Want thicker, stronger arms? Check out How to Do Dumbbell Hammer Curl for proper form, key benefits, and tips to target your biceps and forearms effectively.


